The Ultimate Golden Image Automation Guide – Part 1 Preparation – Citrix PVS and Ivanti / RES ONE Automation
 As you may know I am a huge fan of automating as much as possible and recently I have been really busy with completely automating the Golden Image process with ivanti RES ONE Automation. The goal is to create a new Golden Image by scheduling just one deployment Run book without extra manual tasks. This Guide will be in three parts, the first part is Preparation – Citrix Provisioning Services and Ivanti/RES ONE Automation. The second part is Deploying software – Ivanti / RES ONE software, Citrix VDA, Citrix PVS Target Device and Middleware. The third part is Optimzing/Sealing and Imaging vDisk – BIS-F sealing script and VMware OS optimization tool.
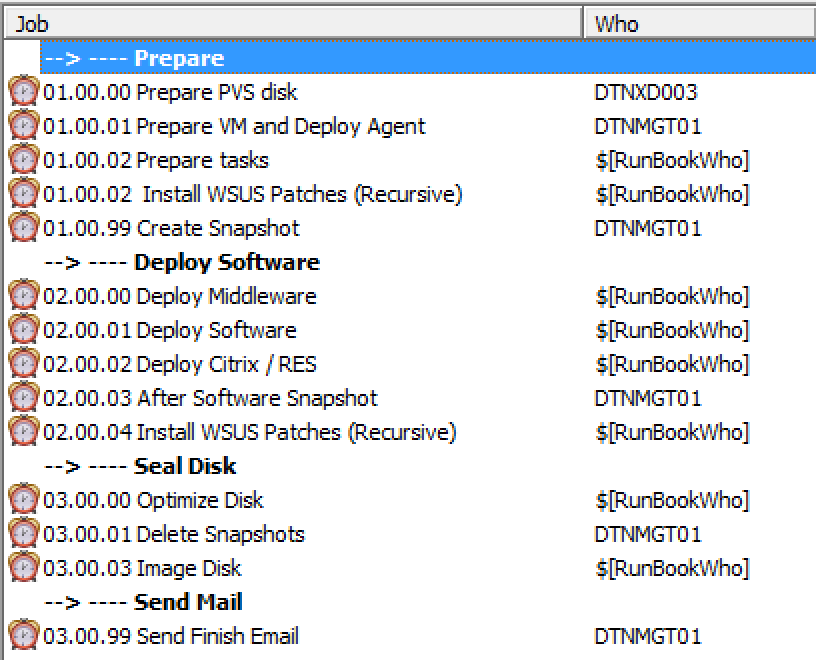
The final deployment Runbook:
What is a Golden Image and why should I create one automatically ?
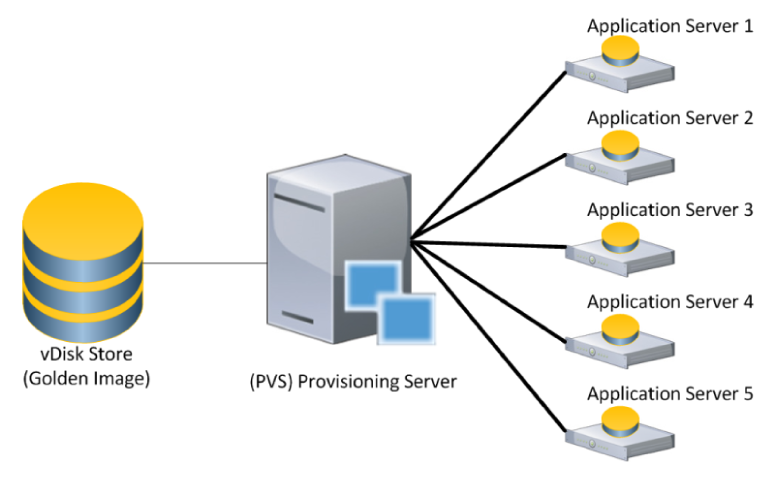
A Golden Image is a template for a virtual machine (VM), virtual desktop, server or hard disk drive. A Golden Image may also be referred to as a clone image, master image or base image. In this blog we will use the Golden Image as our vDisk in Citrix Provisioning Services (PVS). Citrix PVS lets you boot multiple devices from one vDisk. This way all your VDI’s or XenApp servers are the same and after a reboot they return to settings in the Golden Image. Because your whole VDI or XenApp environment will run from this vDisk, it’s really important that this disk is created as clean and unspoiled as possible. That’s why automating the creation of the Golden Image (vDisk) is important. Another good reason for automating the process is the fact that you don’t need to use Citrix Versioning anymore. If something needs to be changed in the disk you don’t create a new version but you edit it in the automation process and create a completely new Golden Image (vDisk) again. This way you will always know what’s in your disk and how it’s build up.
Before we begin; what do we need ?
Before we begin with creating the Golden Image we need a few things, these are:
- Citrix XenDesktop/XenApp environment, this guide will be using 7.15
- Citrix Provisoning Services environment, this guide will be using 7.15
- A new empty VHDX vDisk named _DefaultDisk.vhdx , this must be present in your PVS store.
- Ivanti RES ONE Automation environment, this guide will be using v10.1
- VMware vSphere is used in this guide but you can change this to Hyper-V or XenServer.
- Target VM
Target VM specifications
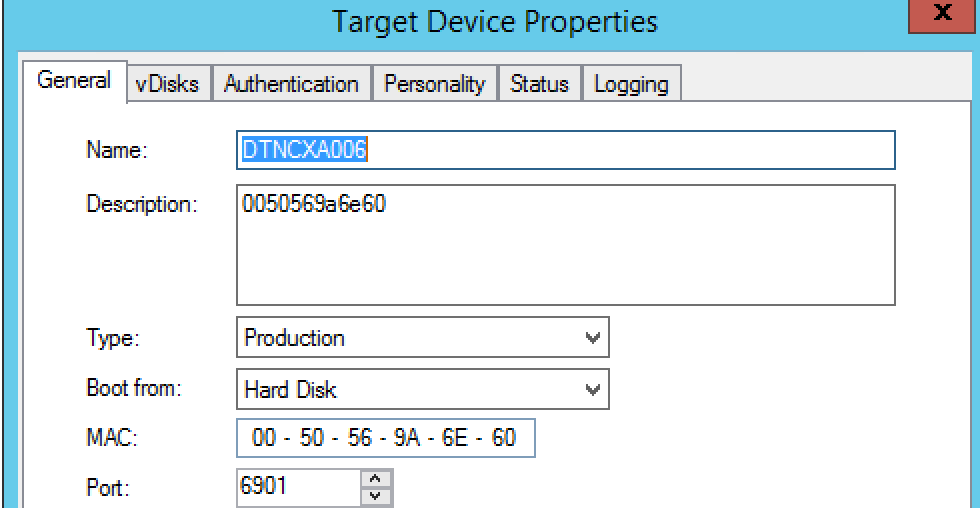
First we need to create a Target VM. This VM will be the machine on which we will create the Golden Image. Create a VM with at least 2 vCPU’s and 4 GB of RAM. Add 2 hard drives to it, one of 100GB (This will be the C: System partition) and one of 40 GB (this will be the D: Cache partition). Now make sure that your target VM can reach the VM network and the PVS network. If you have split this network then you have to add a extra network adapter. Make sure to create reservations for the MAC addresses of the adapters in your DHCP server. This way the target VM will always have the same IP so that DNS always works. When the hardware is done install your OS on the 100 GB Disk. This guide will use Windows Server 2016 as the Golden Image OS but you can of course change that. After installing Windows make sure to install your Hypervisor Tools like VMware tools. Don’t forget to format the second disk and make it the D: Cache Partition and turn the Windows firewall off. If you use computer domain name identification in automation you need to change the workgroup name to the same name as your domain. See here on the success center. If you have all these things in place we need to edit the target VM. Make sure the target VM boots from the PVS network adapter. Then create a new Device in Citrix PVS with the name and MAC address of the target device (which is in this guide DTNCXA006) and set the boot from to Harddisk.
Shut down the target VM and create a snapshot of it, called Before_Runbook. We will revert back to this state every time we start the Golden Image process.
TIP: You could integrate Microsoft MDT into the automation process to also deploy the OS automatically.
Automating Citrix Provisioning Services (PVS)
Because we’re going to make a new vDisk from our Golden Image, we first need to create a new empty vDisk in Citrix Provisioning Services and assign it to the Target VM. These are the first tasks we need to automate. Luckily Citrix PVS comes with a command line tool to create scripts which is called MCLI. You can read all about it here. With MCLI we need to create an Automation task that will do the following:
- Get the date of today just simple PowerShell command (Get-Date -format dd-MM-yyyy) and export results to an Automation parameter called $[date]
- Copy the _DefaultDisk.vhdx in the PVS store and rename it to $[BaseDiskName]-$[Date].vhdx
- Add the new disk to Citrix PVS library
- Assign the disk to the Target VM

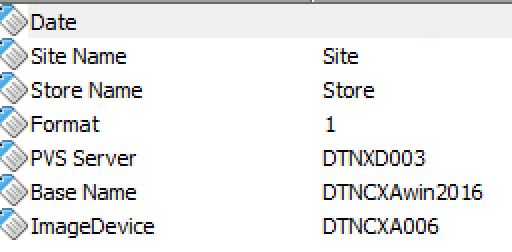
You can download the module to automate Citrix PVS from the RES HUB here. The module must be run on the agent on which your PVS store and PVS server are located. In the guide this is the DTNXD003 . If you don’t want to use the module but want to create your own task, here are the MCLI.exe commands the guide uses:
To Add the new vDisk to the PVS library:
“C:\Program Files\Citrix\Provisioning Services Console\MCLI.exe” add disklocator -r disklocatorName=DISKNAME sitename=SITENAME storename=STORENAME serverName=PVSSERVERNAME format=1
To assign the vDisk to the Target Device:
“C:\Program Files\Citrix\Provisioning Services Console\MCLI.exe” run assigndisklocator -p deviceName=TARGETVMNAME removeexisting=1 disklocatorname=DISKNAME sitename=SITENAME storename=STORENAME
Automate Target VM snapshot
We need a Target VM with a clean installation of Windows and with a extra disk/Partition (in this guide it will be the D: partition) for PVS cache and it needs to boot from LAN. This is the machine that will become our Golden Image vDisk. In this guide I’m going to use Windows Server 2016 and we’re going to turn it into a Citrix XenApp 7.15 server. So it’s important that every time we start the deployment Runbook the target VM is reverted back to its original state. So we need to create a snapshot of the VM to which we can revert. In this guide I created a snapshot called Before_Runbook, after the clean Windows 2016 and VMware tools installation and the configuration of the Cache partition. Now we need to create an Automation task that will do the following:
- Revert back to the Before_Runbook snapshot
- Boot the Target VM
We can do this by using the RES ONE Automation VMWare vCenter connector which can be downloaded here on the RES HUB. The module you need to create:


You must run these tasks on an agent with VMware PowerCLI installed. In my guide this is the DTNMGT01 my management server.
Deploy Ivanti/RES ONE Automation Agent
After the target VM is booted we’re going to start running tasks on the machine. This means that we’re going to need an Automation Agent on it. We can do this with the Deploy RES ONE Automation task and configure it as followed.


As you can see I also added two Postpone Jobs. The first one is 60 seconds to make sure that the Target VM is booted. The last postpone job is there because after this task I want to run tasks on the agent and it can take some time before the agent comes online in Automation, so I added another 60 seconds postpone.
Prepare tasks on Target VM
Now that we have an agent on the target VM we can run some tasks before deploying the software. The tasks that we need to run are the following:

Add to AD
Add to AD is a simple Automation Task called Manage Computer Properties. With this task I add the Target VM to the Domain in a specific OU.

After adding the computer to the domain you must add a Reboot task.

Install Windows Features RDP Host
After that we need to run the module Install-WindowsFeature RDPHost. This is a great module to install Windows features and roles. Download it from the RES HUB created by James Szivos here. The feature we want to install is called RDS-RD-Server. You can add that to the FeatureName parameter. This will effectively run the following PowerShell command: Install-WindowsFeature -Name “RDS-RD-Server” -IncludeManagementTools After the script has run the module will reboot your machine. Now all we need to do is add the Domain Users to the local Remote Desktop Users group we do this with the add to local group task in Automation.
Activate Windows
The last module activates Windows to the KMS server by performing the slmgr.vbs /skms KMSSERVER and slmgr.vbs /ato commands.
Install WSUS Patches (Recursive)
This project will install the Windows Updates from the internet or your WSUS server. The project is created by Virtual Engine’s WSUS Integration Management Pack (WiMP) and you can download it here. A great thing about this project is that it will keep repeating itself until all patches are installed.

For the deployment Runbook I copied the project that the WSUS integration pack from Virtual Engine made and added an extra reboot and extra scan.
Create Snapshot (Optionally)
When you run the deployment Runbook it can take some time before it completes, especially with Windows Updates which can take a long time. But what if your Runbook fails? It’s a shame to start completely over but you don’t want to fix things manually. What can you do? Well, snapshots of course. The same way we revert to the base snapshot in the beginning, that’s how we can also take a snapshot with Automation. So we need to add a snapshot after every stage and in the last stage we need to delete the snapshots. These snapshot are also really handy when testing your deployment Runbook. The module we need to create for this is just a snapshot task with the following setting:

Add Modules to Projects and Projects to Deployment Runbook
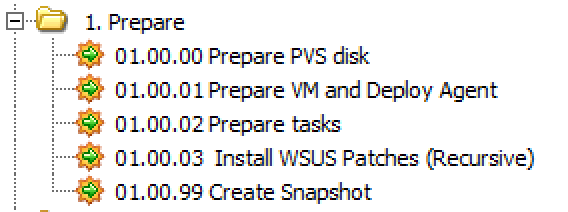
Now that we created all the preparation modules we need to add them into projects and then add the projects to the Deployment Runbook. We need to use a numbering system to keep the projects in the Runbook organized. I use 1 for preparation, 2 for deployment and 3 for Sealing, Optimizing and Imaging the vDisk. The first project we’re going to make is the 01.00.00 Prepare PVS project. In this project we will add the module PVS tasks. This project needs to be run on an agent with PVS console and server installed.

After that we create a 01.00.01 Prepare VM module in this project. We add the revert snapshot, boot VM and Deploy Automation Agent module.

Then we create a third project named 01.00.02 Prepare Task. Here we add the preparation modules, add to ad, install-windowsFeature and Windows Activation.

After that we create the 01.00.03 Install WSUS patches recursive project, which is a clone from the default virtual engine wsus integration project but with an extra Reboot added and Install Updates task added.

The last project is 01.00.99 Create Snapshot. Here we add the After Prepare Snapshot task.

Create Deployment Runbook
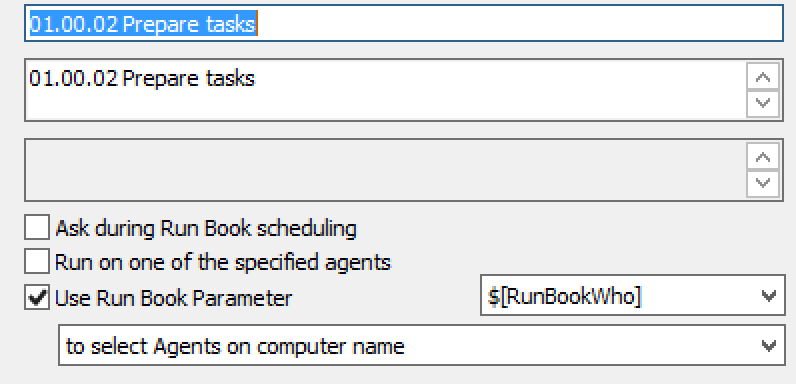
Now we need to add the projects to the deployment Runbook. Make sure to set the right Agents with the right projects. Because the target VM doesn’t have an Automation Agent yet, set the task that we are going to run on the target VM on Use Run Book Parameter and then select RunBookWho. After that, go to the Runbook parameter and enter your Target VM name. In my Runbook its DTNCXA006.


I hope this was informative. Part 2 will be up in a few weeks. For questions or comments you can always give a reaction in the comment section or contact me:

“The same way we revert to the base snapshot in the beginning, that’s how we can also take a snapshot with Automation”
I do not agree that
https://www.starwindsoftware.com/blog/convert-a-physical-linux-server-to-vmware-vm
Sincerely, Trudy
Is it still possible with VMware vCenter 6.0 to use the Ivanti Automation-VMware connector?
since your article is from 2017 i would think so, but i keep getting an error that the VMware PowerCLI is not installed, Which is installed and updated to the latest version available.
regards
Martin
Hi Martin,
It is still possible but requires an older powercli. I would instead just write powercli in Powershell and at that to Ivanti automation. In a upcoming blog I will share the commands.
Hi Chris,
I would like to use your guide to automate the golden image creation but I’m not able to download the modules you use in this guide. For some reason the link is not working anymore. Can I find them elsewhere?
Thanks in advance!
Yeah ivanti stopped with the module share store. Also the document is a bit outdated tbh at the moment but the ideas are still sound.